Showing posts with label Make-up Monday. Show all posts

Clinique Beyond Perfecting 2-in-1 Foundation Review

As an acne prone gal, I always go for full coverage foundations but I hate a heavy foundation, so the search for a perfect foundation for my skin type is quite tricky.
I used to use Estee Lauder DoubleWear Foundation, but it seemed to dry out my skin and set like a clay mask - not cool. So I went on the hunt for another high end foundation replacement (cheap foundations break me out). Clinique were the ONLY counter in John Lewis to offer a tester for foundations. The other brands such as Urban Decay, Charlotte Tilbury etc just expected you to buy the foundation and deal with it. I knew I was never going to just buy a foundation without trying it because I know how sensitive my skin is. Imagine buying a £40 product only to find out that it breaks you out or gives you a rash? NO THANK YOU.

Beyond Perfecting foundation is advertised as a 2 in 1 foundation and concealer, they say you only need to use the foundation to cover blemishes or an uneven skin tone. I have to say that this is true, the coverage is amazing, I only need to use a concealer under my eyes as I like a lighter shade to brighten up that area. Clinique were actually cheaper than all those other stuck up brands, so after I got (badly) colour matched, I went off with a couple of pots (different shades) to test at home. I got about a weeks worth of foundation out of each pot! I decided to buy the colour 15 - Beige, the one they had colour matched me to, but it had a weird tone to it and I ended up having to use a concealer with it to lighten the shade slightly. Recently I found that the colour 10 Honey Wheat is more my tone (slightly orange, but much better than the beige).

Clinique Beyond Perfecting Pros and Cons
PROS:
* Amazing full coverage
* Doesn't feel heavy on the skin
*A little bit of product goes a long way
* Doesn't break me out

CONS:
* Yet to find the perfect shade (are all the colours slightly dodgy? who knows)
* The colour matching service is not great
*The foundation is difficult to set (I use MAC Prep & Prime Powder to set) , it will come off on your pillow or on somebody's T-shirt when you hug them very easily
* Is not cruelty free

See my YouTube video for a coverage reference, I show my acne scars and then I apply the foundation so you can see the difference:


Make Up Monday: Beauty and The Beast, Belle's Make-up look

Seen as the new Beauty and the Beast is around the corner, I thought I would talk about Belle's make up and recommend a couple of products for creating this look.

Belle, although french in the original Disney movie, has the look of an English Rose. An English rose, to me, appears natural but rosey and glowing! Here's a run down on how to achieve an English Rose make up look:

1. Use a light base -  A BB cream or a light foundation (I recommend No7)

2. Conceal under the eyes with a concealer lighter than your skin tone (I recommend Mabelline Age Rewind Concealer)

3. For the eyes, use a beige or brown close to your skin tone on the eyelid and a darker brown to cut your crease. Use a pencil liner as you don't want anything too striking or bold and line your top lash line lightly. Use a lengthening mascara and corner lashes for a Disney Princess effect. Keep your lower lash line bare as this creates a wide eyed effect. Or if you feel you need the balance, apply a soft brown shadow on the bottom lash line with a brush of mascara.

4. Lightly contour the cheeks and tap a bit of pink blusher on the apples of the cheeks. ( I recommend NYX, darker skin tones go for a peachy tone, lighter skin tones go for a light pink)

5. Use a highlighter to highlight your cheekbones! (I recommend MAC Soft and Gentle)

6. The brows need to remain natural looking and bushy for an innocent look. Use a powder slightly lighter than your natural brow colour (if your brows are black or dark brown) and fill in the gaps without drawing a completely new shape. ( I recommend Barry M's Eyebrow kit)

7. And of course, apply red lip stick to the lips. (I recommend Gerard cosmetics)

Although my skin tone is darker than your average English Rose, I tend to use this make up look a lot as it's a neutral pretty look.
My favourite products for creating this look on me are: 
- Gerard Cosmetics - Red Lipstick in Fire Engine
- NYX Showgirl Eyeshadow, which is a warm orange colour so it's good to blend this with your browns if they appear too dark.


Thanks for reading! As always, let me know if you have any questions!

If you would like to see a make-up tutorial, have a look at my video below :)


Make up Monday: Look tanned in the Winter!


Most of us want that bronze 'just been on holiday' glow, but anyone who lives in the UK will know the struggle. Our summer is so unreliable, it's pretty hard to get a chance to sun bathe!
Some of you may be thinking, 'hey, aren't you naturally tanned?' I am mixed race after all! But my skin tone in the Winter is quite wishy washy. Without my much needed vitamin D, my skin turns green... yes green. I can only think it's because medium skin tones often have yellow undertones, so in the winter I do actually resemble an olive.
I always thought self tanner was only for pale skin tones. I'd feel silly putting fake tan on so I never did. Instead I just flaunted my green legs while my friends looked lovely and bronze.
But that all changed when my mum came home with a body lotion with self tanner in it. I'd always known about these, but once again I just assumed brown/ green people couldn't use products designed for paler skin tones. My mum raved about this tanning body cream and told me to give it a go, so with nothing to lose,  I did. The moisturiser gave me a subtle bronze glow after a few days of use which made me look like i'd been out in the sun. I looked like a healthy brown girl again! Goodbye olive legs!

I went out and bought my own self tanning moisturiser and discovered that Dove had designed the lotion for different skin tones (fair to medium & medium to dark skin), my mum had got the fair - medium version, so I decided to pick up the medium-dark. The darker version worked better with my skin tone, giving me a deeper tan. Because it is a slower way of tanning (it takes a few days to see any difference), there are no streaks! and the colour is build-able. By slowly building up your tan, you skip the whole 'oh crap, i'm orange' stage, because you can slowly see how the tan is working with your skin tone so you can stop at any point.

If you're scared about buying a self tanner that develops overnight and you're against sun beds (like I am), try using 'Dove Derma Spa Summer Revived' It's sold almost everywhere (Boots, Tesco etc) and is currently on offer at Tesco! (Was £5 now £3.50)

If you're not much of a reader, try watching my Youtube review!


-Robyn x

MAC Highlighter review


I'm giving that YouTube thing another go!

I personally love listening to reviews and getting to know a product before I buy it. I'm currently obsessed with highlighters (aren't we all) , so I thought I'd review a high end highlighter vs a high street brand. Is there really a difference when it comes to quality?
Watch and find out! :)

Neal's Yard Remedies: Review

A couple of months ago, I got given a few products & testers to review from Neal's Yard representative, Jodie. I had never heard of them before, which is strange because they're a well known and established brand. After a quick research, I discovered that they're an affordable and ethical brand who are very aware of the nasty chemicals in most products we use, they pride themselves on using organic and eco-friendly ingredients to create the best and most natural skincare range. They also do not test on animals which is probably the best thing about the company.
http://www.nealsyardremedies.com/about-us-pages/beliefs/ethics.html


As I have oily skin - normal skin, my review might not be beneficial to those with different skin types.

The Oily & Combination Skincare Kit:
£15.00


- Cleanser & Toner: The cleanser is the kind of cleanser you use after you wet your face, rather than a cream based cleanser you use with cotton wool. I usually prefer cleansers which don't require water but this was handy for when I was in the shower, the texture's smooth and soapy, so it's not an exfoliater but it's an effective cleanser. I found it strange to use a toner after cleansing my face with water because it already felt squeaky clean, but the toner did feel soothing and didn't dry out my skin too much. 
ProsYou can really tell the difference between organic and non-organic products. These didn't dry out my skin like off the shelf brands & smelt very natural and refreshing.
Cons: I didn't really feel the need to use a toner after cleansing my face and washing it off thoroughly with water. I would prefer a cream based cleanser and then use a toner after that.

Moisturiser: The moisturiser has quite an odd texture, once again, I think it's because it's not clogged up with chemicals and un-natural ingredients. It's an extremely light texture, very watery and when rubbing it in, it feels slimy. But once it's rubbed into your face, it evaporates completely. No oily residue, no shine which suits me because I already have oily skin!
The smell is quite strong and kind of unusual, it isn't unpleasant, it's quite soothing actually because it smells like a variety of herbs and plants straight from nature. 
Pros: Fast drying & because it's so watery, you only need to use a tiny bit each time.
Cons: I sometimes felt my face needed a heavier moisturiser if my skin felt dryer than usual

- Face Mask: The face mask has to be one of my favourite products from this review. It's supposed to unclog pores, give a deep cleanse and minimise blemishes. I don't know if it did all that, but i found it to be so refreshing, It made my skin feel extremely soft and extra clean. 
My skin has always been sensitive, as a teen I suffered from acne & often got a nasty reaction from any product out of my daily routine (I used simple cleanser & oil free moisturiser). So for years I have stayed away from those 99p face masks which look fun, but I know are full of reaction inducing ingredients. So i'm so pleased to have found this natural & organic face mask which doesn't make my skin come up in a thousand little spots.
Pros: It's a thick clay like texture which makes my skin feel baby soft without drying it out.
Cons: It's messy to apply and take off & it can itch a bit as it's drying.


Testers:

-Wild Rose Beauty Balm (£38 - 50g) : This product interested me because I wasn't certain on what it was for or how it would work better for me. It's a thick & smooth honey like texture, which is oily rather than sticky. They say it can be used as a 'rich cleanser, gentle exfoliant or deeply nourishing balm – to quench areas of dry or dehydrated skin.' So the directions suggested to massage it onto your face and then wipe it off with a damp cloth as an exfoliator or leave it on for a nourishing treatment. Rubbing it on then off felt like a waste of product, although it did make my skin feel soft. But I decided to leave it on over night for that nourishing treatment which resulted in me having a bit of a reaction (small under the skin spots). So as an exfoliator it's brilliant! But it's way too heavy for my skin to use as a moistuiser, it may work wonders on dry skin though!
Pros: It's a soft and effective exfoliator which nourishes skin at the same time, you may not even need to use a moisturiser afterwards.
Cons: Leaving it on my skin as a moistuiser left my skin feeling clogged, it also has an oily texture which you will notice in the sunlight or underneath make-up.
Beauty Balm
Frankincense Intense Cream- This was my favourite product out of them all! I'm a sucker for anti-aging products, especially if they have names like Frankincense! I mean what is that?, I thought it only existed in the story of Christmas? It must be magical. I used this product as a moisturiser & primer before putting on my make up for the day. Now I have an active imagination, it's true, but I could literally feel it tightening my skin (in a good way) & erasing fine lines. Unfortunately, as I only had a sachet, I couldn't use it for long enough to really monitor the effects & results.
Pros: It felt light & rejuvenating.
Cons: It's a whopping £55 for 50g, but it is very highly praised so in my opinion, worth it if you can afford it.

Mini Reviews:
Purifying Palmarosa Mattifier (£31/30ml): I used this product as a primer under my make-up instead of using a moisturiser & it really did help keep my face oil free.

Purifying Palmarosa Facial Polish (£16/100g): This product acts as a scrub & cleanser, I generally prefer buying scrubs rather than normal cleansers because I feel like they benefit my skin a little more. This one gently exfoliated my skin & didn't make my face red or blotchy (which sometimes happens with scrubs.)

Coconut oil :I've always been a fan of coconut oil. I use it for all sorts: Hair mask, eyelash serum & moisturiser. It's so important to pick up a virgin oil, which means it's 100% natural with no added chemicals, just pure coconut oil. You could eat it if you wanted to. Neal's Yard sell an organic virgin coconut oil for £9 / 300g.

Lip Gloss(Bayberry £9.50): I'm not usually a lip gloss fan because they're sticky, not very pigmented and have no real purpose but my Bayberry lip gloss is basically a lip balm! It's so nourishing and slightly pigmented with a little bit of glitter thrown in there. I wear it over lip liner for a subtle rosey look which at the same time cures my dry lips.

- If you're interested in purchasing any of these products, visit Jodie's NYR website:

She also runs a beauty salon in Hawkwell, Essex which offers treatments using the natural and organic products of Neal's Yard Remedies


Whiten Your Teeth at Home!

A lot of people ask me what I use to whiten my teeth, so I've decided to write a review on what products I have come across and what ones have worked the best for me.

Back in 2011, my obsession with teeth whitening began! Being a bit addicted to make-up and vibrant lipsticks, I really noticed the difference between lipstick against white teeth and lipstick against yellow or stained teeth. Getting your teeth whitened was something that few people did, a bit like plastic surgery, too expensive and definitely not a priority! But after watching a few American make-up gurus on YouTube, I noticed that they all had amazingly white teeth! So I decided to investigate, surely not everyone could afford to pay the huge sum at the dentists?
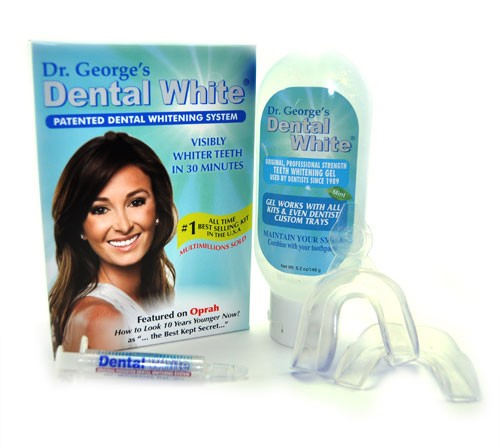
I soon discovered that the good old Americans had in fact found a cheap and mainstream way to whiten teeth at home. The most common way to whiten teeth was to buy a gel which usually came with a cap you molded your tooth shape in to. I told my mum of my latest beauty addict discovery, so when my birthday came around, I received the magic potion that was the 'Dr. George's Dental White' kit.


I hadn't heard of this brand as, like I said, it was American, but it looked promising with 'featured on Oprah' printed boldly on the box. So off I went, determined to get those minty white teeth! The taste at first was hard to ignore but if you really want something, you put up with things like that! The trick with whitening your teeth at home is to be consistent. It takes patience and dedication as the formula isn't as strong as it is at a dentists. I left the gel on for an hour every night for 2-3 weeks, at first I didn't notice a difference as its a gradual process, but people kept commenting on how white my teeth had become. So I did the lipstick test and put on a deep red to see if my teeth glowed like my YouTube idols..... and they did! It worked!


Once you get them to that whiteness, they basically stay like it! I left mine for 2 years and then decided to get 'Crest 3D White strips' (another popular product in America & non existent in the U.K), just to re-fresh my smile. (OCD?) ... The strips work just as well and are definitely easier and more comfortable. You don't get the gel seeping out as its just a kind of tape you glue to your teeth for an hour. 


The main side effect of any good teeth whitener is sensitivity. I noticed with the strips, the next day my teeth would feel really sensitive and a little bit painful, I later realised it was because the strip went over the tops of my bottom set of teeth, so I cut the strip down just so it didn't over lap the tops and that seemed to solve my problem.


DIY teeth whitening kits are so worth the money, on average they sell for £30-£50, a fraction of a dentist's price, and I still have the gel left over from my first Dr.George's box which I can mix with my toothpaste for a subtle whitening top up. Just be sure to do your research, and stay away from cheap, off the shelf products. They are usually cheap for a reason!

I hope this review has helped ! Feel free to comment if you have any questions :)
-Robyn <3

May Faves!

May went by so fast! Suddenly Summer is around the corner & I couldn't be happier! I'm looking forward to sunbathing in the garden, sitting in pub gardens drinking cider and warming up my skin tone because I tend to go green brown in the winter lol.

Here are my favourite things from the past month:

1. Coconut oil
I always rave about coconut oil, it has so many uses and it's completely natural so I don't have to worry about getting any allergic reactions from harsh chemicals and what not.
So this month I've been using coconut oil heavily on my hair. Because it's been bleached about ten times, it's so dry. I warm up some coconut oil, smother it all over my hair and then wrap my hair up in a plastic bag to keep the oil warm, I also use it as a serum on the ends of my hair between washes if it gets a bit dry. 
Secondly, I've started to apply it to my eyelashes. Just google coconut oil for eyelashes and you'll find countless amounts of articles on how it promotes hair growth. I've only just started using it, so I couldn't say if it works but I've been a bit addicted to eye lash extensions and i'm aware that they're damaging my natural lashes so i'm going to apply the oil day and night once the extensions have all fallen out.

2. NARS Radiant creamy concealer 
Concealers are so important to me, mainly because I get really dark under eye circles so I need a good concealer to both conceal and highlight underneath my eye. So many make-up gurus have raved about the NARS creamy concealer so I thought I'd defer from M.A.C and try out NARS. I bought it in the colour ginger and while it's too dark to highlight underneath my eye, it does conceal. I use it as a corrector because its a very warm colour with orange tones which conceals the dark circles, I then put a lighter concealer on top as a highlighter. I've already bought my second tube so it's definitely been a favourite!


3. Game Of Thrones!
For ages I was against watching Game of Thrones, I didn't get it and didn't understand why it was becoming so popular, I thought it was some low budget tacky wannabe LOTR show. But so many people said I would love it, so I eventually gave in and started watching it from the beginning and now I absolutely love it! Don't get me wrong, it still confuses me how some medieval fantasy based nerdy story is dominating the world when people love to take the mickey out of that genre (World of Warcraft anyone?)... but I'm not complaining because I love it all! I just wish the seasons were longer and more frequent (they bring out one short season per year!) Every Monday, I literally treat it like a ritual and demand pure silence within the household, I can not miss a word! There's so much to it, how one man has come up with such a complex fictional world complete with individual histories for each family and land is beyond me. And the fact that you never know who will die next really keeps you on the edge of your seat. He has no problem killing off the characters you were rooting for, everything is so unexpected. The author is a pure genius!

Wet Look Tips & Tricks

I absolutely loveeeee wet look photoshoots. I don't often shoot them which is disappointing because the images always turn out so sexy and striking! So I took matters into my own hands and exercised my creative side by doing a self-portrait shoot. I've wanted to do a shoot like this for so long but never had a proper vision for it. This time however, I collaborated with a London Boutique called Ceekit, who supplied me with a super sexy Baywatch inspired swimsuit. It's so dainty and a little intimidating at first but the subtle golden tone of the swimsuit complemented my overall bronzed look and made me feel amazing!


Oil
So there's one main tip that everyone needs to know about if you want to shoot a wet look, and that's how to use oil! I use coconut oil in my hair and on my skin because: 
1. After wetting down your hair, the oil will help it appear wetter for longer (it also acts as a conditioning mask) 
2. It will make your skin glow on camera.

Metallic Eye make-up
Sleek do amazing metallic eye shadow palettes, I use golds, bronzes and browns and then heavily line my upper and lower lash line with a black pencil. Just make sure everything blends, I usually smudge in my eyeliner with my finger for a naturally kind of worn look.

Highlighters
Liquid highlighters work best with wet looks. I use Revlon's Illuminating Photo Ready in pink/ peach. 
Dab it onto your cheekbones, under your brow and cupids bow.

Overall, just make sure you glow! If you don't feel OTT, then you probably haven't got enough oil and highlighter on.

Check out my page, and if you're interested in shooting with me, feel free to email:
RobynJanePhotography@yahoo.co.uk
& Check out Ceekit, where you can still purchase this swimsuit!
www.Ceekit.co.uk


 - Robyn x


FIRST EVER BLOG POST!

Mini Haul: Animal Cruelty Free Products

Well hey there, and welcome to my brand new sparkly blog!
I wanted my first post to be useful and semi-interesting (well if you like make-up!).
I think everyone is opposed to products being tested on animals, it's incredibly sad and seems out of our control. I personally find it really hard to find brands who are not only cruelty free but who are also reasonably priced. In the past cruelty free brands I have found have been high end and definitely out of my price range, but more and more companies are waking up and changing their methods!
NYX and Superdrug's own brand B are just two of the mainstream brands I've discovered who sell good quality products for reasonable prices. 

Not all of my products in my make-up kit are cruelty free but I just think, do what you can, and if that just means swapping a few products here and there, then just do that. Every little helps!

In this video, I give a brief review on all of the products purchased & they are:
NYX Eurotrash Matte Lipstick - £6
NYX Istanbul Matte Lip Creme - £7
NYX Spellbound Lipstick -£4
NYX Nutmeg & Plush Red Lip liners - £3.50 each
B. All Mascara Black - £9.99 / £4.99 in the sale
B. Groomed Eye brow Kit - £4.19

& if you're interested in seeing how the lip colours come out, then take a look at the images I've posted below :)


What one is your favourite?

Thanks for reading! <3
- Robyn x